 As presented in an earlier blog post, the Android adb daemon (in the host device) can be set to listen for requests coming from wifi or ethernet instead of the default usb. This process is common for the majority of Android smartphone/tablets and in order to achieve it, the host device must receive at least a set of initialisation commands sent throughout the mini-usb connector.
The mini-usb is a very good connector but when you have to disconnect and reconnect it many times, it may fail or broke. As a consequence, having a mini-usb connector that does not work, means that you can not upload your apks, debug and in general manage your Android device.
The Ltouch Android-based touch panels do not suffer from this issue because they allow you to switch the adb to ethernet/wifi even when the mini-usb does not work or is broken.
This article will present a step-by-step tutorial and will show you how to accomplish that. The main prerequisite is having a Ltouch Android or a Ltouch43
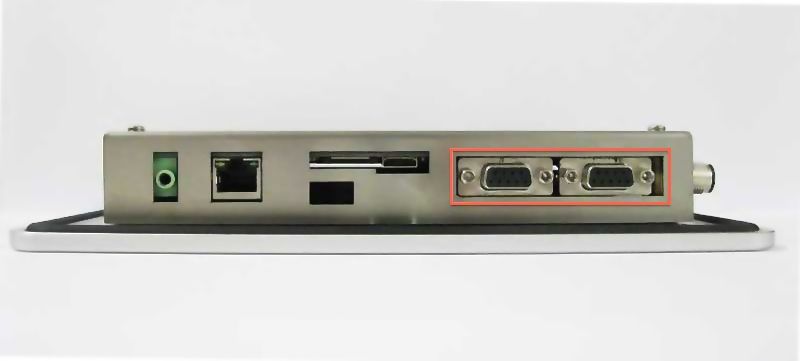
The key part is to leverage a great feature of the Ltouch, that is, you can use both the mini-usb and an additional serial line in order to access and control it. When the former does not work, basically just use the latter. This additional serial line is placed on the rear part of the panel and is represented by a DB9 connector. On the rear cover of the Ltouch, there are two DB9 serial connectors (see the picture above), one is used for RS232 communication and the other one is used for Android logging and managing.
The leftmost one (the closest to the power connector) is used when the Android 4.0.4 is installed, whereas the rightmost with Android 2.3.
Now, just use the serial cable provided in the package (eventually with a usb-to-serial converter) and a serial terminal program, the one that you prefer. We suggest:
- Minicom on Linux
- SerialCRT/Hyperterminal on Windows
- CoolTerm on Mac
The serial port parameters are the following: 115200 baudrate N-8-1.
When turning the Ltouch on, you will immediately see the Android logs (the bootloader and the kernel) in the serial terminal program. Once it will finish to boot, just press enter and you will be prompted directly inside the device. Now:
1. Check the mount points with the command:
mountThe output might be for instance:
rootfs / rootfs rw,relatime 0 0 tmpfs /dev tmpfs rw,nosuid,relatime,mode=755 0 0 devpts /dev/pts devpts rw,relatime,mode=600 0 0 proc /proc proc rw,relatime 0 0 sysfs /sys sysfs rw,relatime 0 0 none /acct cgroup rw,relatime,cpuacct 0 0 tmpfs /mnt/asec tmpfs rw,relatime,mode=755,gid=1000 0 0 tmpfs /mnt/obb tmpfs rw,relatime,mode=755,gid=1000 0 0 none /dev/cpuctl cgroup rw,relatime,cpu 0 0 /dev/block/mmcblk0p2 /system ext4 ro,relatime,user_xattr,acl,barrier=1,data=ordered 0 0 /dev/block/mmcblk0p4 /data ext4 rw,nosuid,nodev,noatime,user_xattr,acl,barrier=1,data=ordered 0 0 /dev/block/mmcblk0p3 /cache ext4 rw,nosuid,nodev,noatime,user_xattr,acl,barrier=1,data=ordered 0 0 /dev/block/mmcblk0p1 /config ext4 rw,nosuid,nodev,relatime,user_xattr,acl,barrier=1,data=ordered 0 0The partition that we need to remount is named /system and it is currently mounted as read-only (check the “ro” string)
2. In order to remount it as read/write permission, type
mount -o remount,rw -t yaffs2 /dev/block/mtdblock2 /systemPlease remember that if you are using another device than the Ltouch, you need a rooted one and you have to use the correct block id that refers to the system partition (/dev/block/mtdblock2 in our case)
3. Add the following string at the end of the file build.prop (found on the /system folder):
cd /system echo “service.adb.tcp.port=555” >> build.propThis will tell the adb daemon on the host to listen for request on tcp port number 5555.
4. Reboot the device
5. From the host pc, type the following commands in order to let the adb server (that is running in your PC) to correctly connect to the device with the specified ip and tcp port 5555:
adb tcpip 5555 adb connect 192.168.0.101:5555In order to get the device’s ip address, just use the command netcfg from the command line.
What do you think? Did you like it? As usual, comments are welcome! 🙂
