How to measure a level trought analog inputs and with LtouchGS

Our LtouchGS product is ideally suited for the industrial environment, where analog signals are to be acquired.
LtouchGS comes standard with two analog inputs, voltage or current, with a resolution of 17 bits.
In this article, we explain the main steps to create an application that detects a tank level and then triggers an alarm and sends it via email.

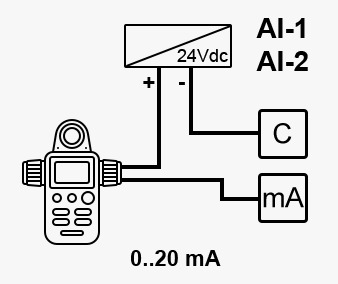
First we need to connect our level sensor with 0.20 mA analog output to our input, following this image.

We must respect the polarity and so we connect the ground of power supply wire to the GND terminal of the Ltouch.
The output wire of sensor must be connected to the current mA terminal of the Ltouch.

Finally, the code for this setup is very simple. The following diagram measures the 0-20mA signals on channel 1, with a resolution of 17 bits, and maps the current over a level range. This mapping will depend on the transmitter, the example below maps from 0 mA to 0 cm and from 20 mA to 100 cm.

Now let’s move on to the code part for the APP:

You can use the library BMTouch to configure and read the values in to android studio.

View this for download library 

View this for how to use BMtouch Library

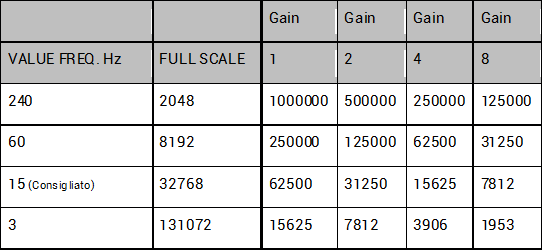
To configure the sampling frequency directly write the value of the frequency and scale through the library subito dopo protected void onCreate :

BMTouch.ADC_set_scale((byte) 0, (byte) 0, 1);

BMTouch.ADC_set_frequency((byte) 0, 15);

Now we can call the library function to read the analog value through a single call or by creating a TimerTask that executes this cyclically, you can see on this video how to do it.

ch1_val = BMTouch.ADC_read_channel((byte) 0, (byte)0);

ich1_val returns the value read from 0 to 32768, it is up to us to know that 32768 is hight 100 cm, so we can make a portion and find the quantity of the tank.

To send an email at a minimum or maximum threshold, we can watch this video that explains in detail how to send an email through gmail.

that’s all, if you have any doubts or requests, contact us by email.

Database SQLite e Datalogger in Android

Nel post di oggi andremo ad analizzare nel dettaglio i passi da seguire ai fini di realizzare un DataBase SQLite in Android Studio. In particolare il DB da noi realizzato si occuperà di salvare ad intervalli di tempo regolari informazioni in merito a temperatura e tempo, che verranno poi utilizzati per la creazione di un grafico.
Ma andiamo con ordine, per prima cosa aprite un vostro progetto o createne uno nuovo e aggiungete al suo interno una nuova classe che estenda SQLiteOpenHelper come nell’esempio qua sotto

public class DatabaseHelper extends SQLiteOpenHelper { }

A questo punto il compilatore vi obbligherà ad inserire i metodi della classe SQLiteOpenHelper quali il costruttore, onCreate() e onUpgrade(). Il primo si occuperà di creare il DB fisico locale nonchè l’oggetto DatabaseHelper ( II° parametro vuole in ingresso il nome del DataBase ), il secondo si occuperà di creare la tabella all’interno del DB, mentre il terzo si occuperà di fare alcuni accorgimenti nel caso in cui venga modificato il DB fisico locale ( ma non lo tratteremo in questa guida ). La tabella di nome temperature_table che andremo a realizzare sarà composta da tre colonne:

ID Temperatura Tempo
1 23.285 1597753508
2 23.324 1597753510

Per realizzare il tutto a livello software:

private static final String DB_name = "DB_CHART.db";
private static final String TABLE_name = "temperature_table";
private static final String COL_1 = "ID";
private static final String COL_2 = "Temperature";
private static final String COL_3 = "Time";

public DatabaseHelper(@Nullable Context context) {
  super(context, DB_name, null, 1);
}

@Override
public void onCreate(SQLiteDatabase db) {
   String CreationQuery = "CREATE TABLE "+TABLE_name+" ( " +
    COL_1 + " INTEGER PRIMARY KEY AUTOINCREMENT," +
    COL_2 + " REAL," +
   COL_3 + " INTEGER )";
    db.execSQL(CreationQuery);
}

@Override
public void onUpgrade(SQLiteDatabase db, int oldVersion, int newVersion) {
 db.execSQL("DROP TABLE IF EXISTS "+ TABLE_name);
    onCreate(db);
}

Inseriamo i metodi per la lettura, scrittura e cancellazione ( di tutti i dati all’interno della tabella con ripristino ID al valore iniziale, metodo utile solo in questo contesto ).

/**
 * Metodo per scrivere sulla table del Database
 * @param Temperature : temperatura ( double )
 * @param Time : tempo trascorso ( long integer ) - timestamp unix
 * @return true se l'operazione è andata a buon fine, false altrimenti
*/
public boolean saveNewRow(double Temperature, long Time){
    boolean getResult;
    //Ottengo il DB in modalità scrittura
SQLiteDatabase mioDB = this.getWritableDatabase();
//Creo una nuova mappa di valori, in cui i nomi delle colonne sono le chiavi
ContentValues cv = new ContentValues();
//nomeColonna / valore
cv.put("Temperature",Temperature);
cv.put("Time",Time);
//Eseguo l'inserimento nella tabella
try{
mioDB.insert(TABLE_name,null,cv);
getResult = true;
}catch(SQLException sqle){
//Caso in cui l'inserimento non è andato a buon fine
sqle.printStackTrace();
getResult = false;
}
//Chiudo il db ( aperto in modalità scrittura )
   mioDB.close();
    return getResult;
}

/**
* Metodo per ottenere tutti i dati presenti all'interno della tabella temperature_table
* ( anche se alla fine tengo conto solo delle colonne Time e Temperature )
* @return : DataPoint[]
*/
public DataPoint[] getAllData(){
//Ottengo il DB in modalità lettura
SQLiteDatabase mioDB = this.getReadableDatabase();
//Creo un oggetto Cursor per selezionare tutti i dati all'interno della tabella
Cursor mioCursor = mioDB.rawQuery("SELECT * FROM "+TABLE_name,null);
//Istanzio DataPoint di dimensione pari a mioCursore.getCount() ( ovvero pari al numero di
// righe )
DataPoint[] mieiDataPoint = new DataPoint[mioCursor.getCount()];
//Con questo ciclo creo i vari datapoint (x,y) e prendo min e max di entrambi gli assi
for(int i = 0; i < mioCursor.getCount(); i++){
mioCursor.moveToNext();
if (i == 0){
MinX = mioCursor.getInt(mioCursor.getColumnIndex("Time"));
MinY = mioCursor.getDouble(mioCursor.getColumnIndex("Temperature"));
}
if(i == (mioCursor.getCount()-1)){
MaxX = mioCursor.getInt(mioCursor.getColumnIndex("Time"));
MaxY = mioCursor.getDouble(mioCursor.getColumnIndex("Temperature"));
}
mieiDataPoint[i] = new DataPoint(mioCursor.getInt(mioCursor.getColumnIndex("Time")),mioCursor.getDouble(mioCursor.getColumnIndex("Temperature")));
}
//Chiudo il db ( aperto in modalità lettura )
mioDB.close();
return mieiDataPoint;
}

/**
 * Metodo per cancellare tutte le righe del database, riporta anche l'autoincrement ( ID ) al
 * valore iniziale
 */
public void eraseEverything(){
//Ottengo il DB in modalità scrittura
SQLiteDatabase mioDB = this.getWritableDatabase();
//Elimino tutte le righe
mioDB.execSQL("DELETE FROM "+TABLE_name);
//Ripristino ad 1 l'autoincrement ID
mioDB.execSQL("UPDATE SQLITE_SEQUENCE SET SEQ=0 WHERE NAME='"+TABLE_name+"'");
//Chiudo il DB ( aperto in modalità scrittura )
mioDB.close();
}

Nel nostro caso con il metodo getAllData() estraiamo i dati e li passiamo ad un vettore di DataPoint[ ] in quanto il loro utilizzo è limitato solo alla creazione di un grafico, nulla vieta che i dati possano essere estratti e passati a variabili di altro tipo. Il consiglio è quello di non passare mai l’oggetto Cursor ( anche se l’applicativo funzionerebbe comunque ). Ricordarsi sempre di chiudere il DB ( aperto in modalità lettura/scrittura ).
Adesso non rimane altro che creare l’oggetto DatabaseHelper dove vi serve per avere accesso a tutti i metodi.

//Creazione oggetto mioDBHelper nell'onCreate() della main activity
mioDBHelper = new DatabaseHelper(this);
ADB and micro USB for data communication

ADB stands for “Android Debug Bridge” and it basically just allows you to send commands to your device Ltouch.

Download SDK Platform Tools ADB is a small tool bundled in the Android SDK as part of the “Platform Tools.”

ADB stands for “Android Debug Bridge” and it basically just allows you to send commands to your device.

Users used to be required to download the entire SDK (which is very large) just to use ADB, but Google now allows users to download only the Platform Tools.

  • Download the SDK Platform Tools for Windows, Mac, or Linux from https://developer.android.com/studio/releases/platform-tools.html
  • Extract the ZIP file somewhere easily accessible (like C:\platform-tools) We’ve got ADB downloaded on your computer and your Android device is ready to receive instructions.
  • Now it’s time to put it all together and run your first ADB command.
  • Connect your Ltouch to the computer with a USB cable
  • The USB mode must be PTP in order for ADB to work. You can usually change this from the notification shade
  • Make sure to allow USB debugging if a pop-up appears
  • Open the platform-tools folder on your computer
  • Shift+Right Click and select Open command prompt here
  • Type adb devices and hit Enter

That’s all, good work

New Ltouch7 Plus

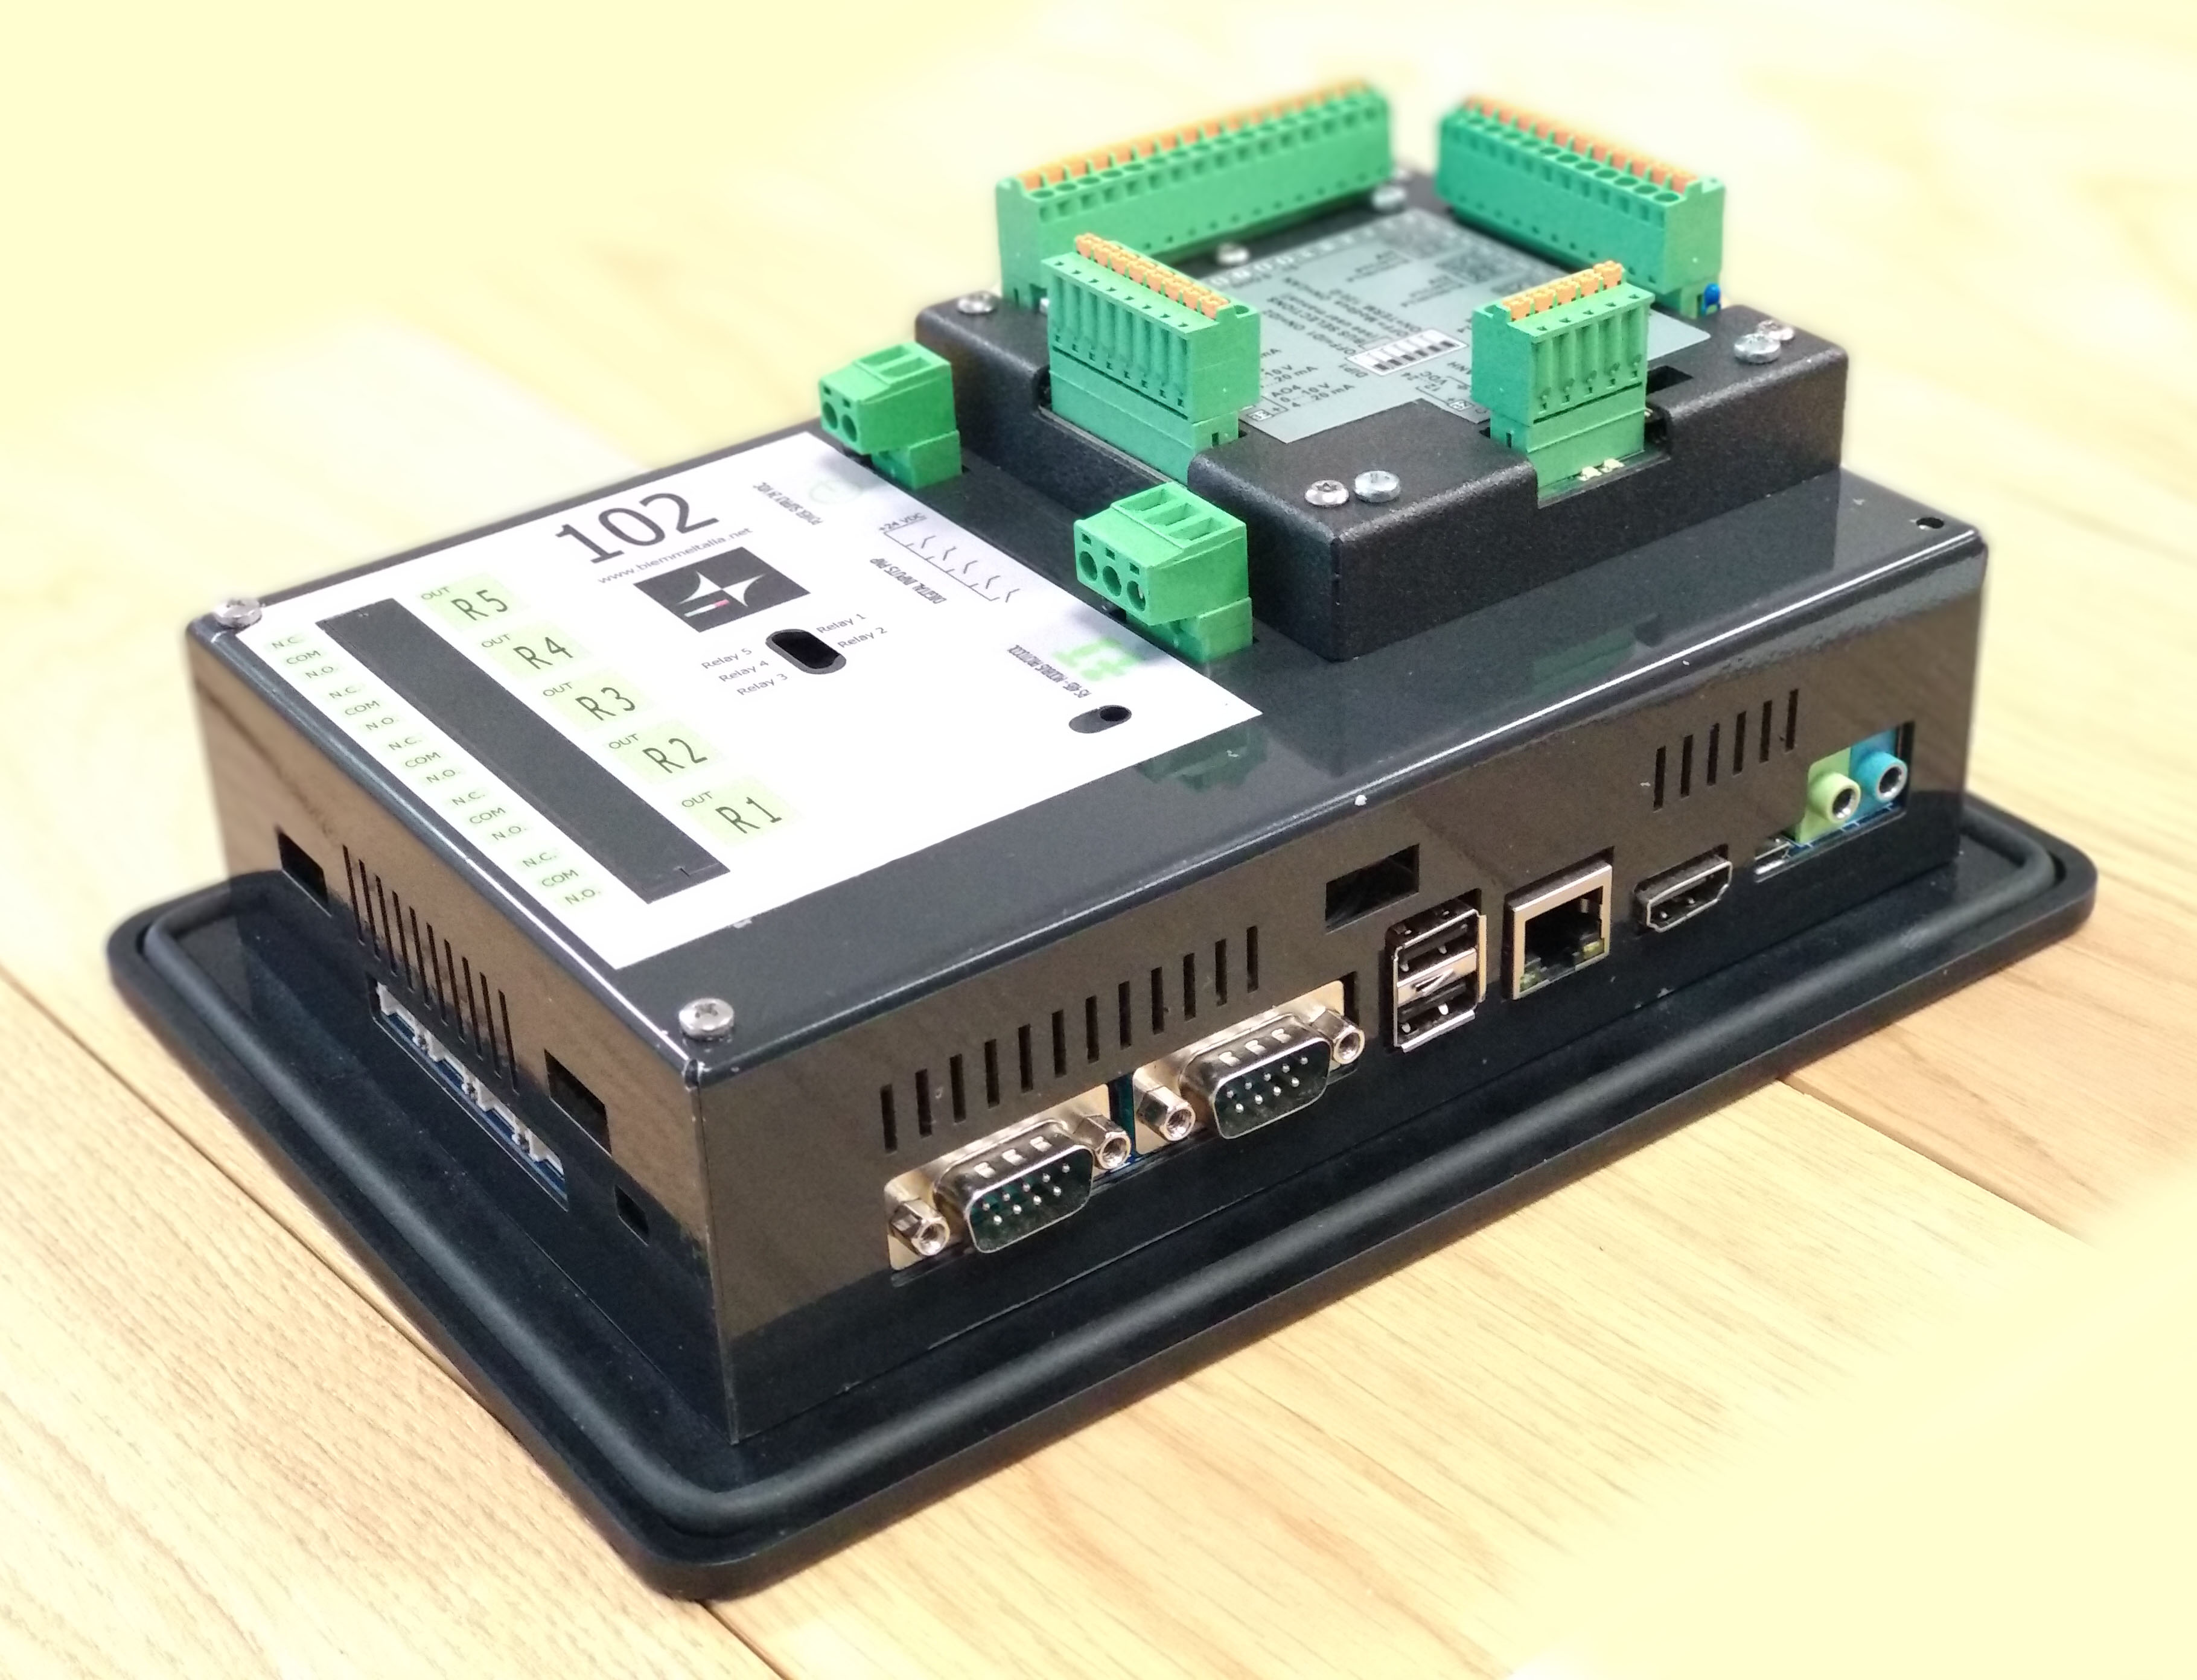
Coming soon a new black HMI touch screen panel with Android operating system with inputs and outputs on board.
16 digital inputs / outputs, 4 configurable analog inputs with 16bit resolution, 4 analog outputs 0..10V / 4..20mA.
Display HD 7 “capacitive resolution 1028×800 IP56.

Quad core A9 dinamyc frequency scaling from 400 to 1.4G Hz.

A new native library dedicated to manage the inputs and outputs.

Performance tests in case of rs485 failure

In my home automation project with Arduino and Android I always paid special attention to communication failures. These might happens for many reasons and the system has to deal with them.

In particular, in the following video I was interested to show you some test I made in order to assess whether the information presented by the touchscreen panel will be displayed whenever available.

The red led indicates that the Arduino is processing a modbus request. As you can see, it stops blinking when the bus 485 is interrupted and immediately after the connection has been restored, it restart to work. Indeed, take look at the bulb icons in the monitor. When the bus is restored, the bulb status will be updated.

The description of the project and the source code are also available. Take a look!

As usual, comments are well appreciated! 🙂

Android App and Modbus RTU

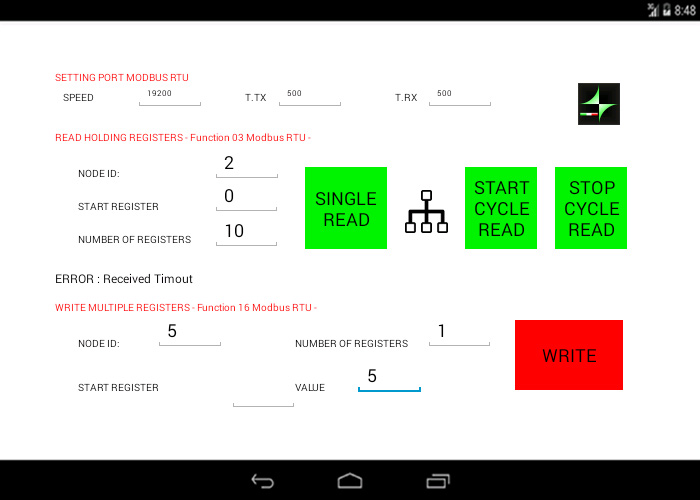
We made a small and simple application for our well Ltouch panels to allow users to configure and subsequently communicate with all Modbus RTU devices.

Biemme Config, will be installed as standard on all our touch, so make it easier to configure the Modbus RTU devices.

In a few simple steps we can write and read using the Modbus RTU functions 03 and 16.

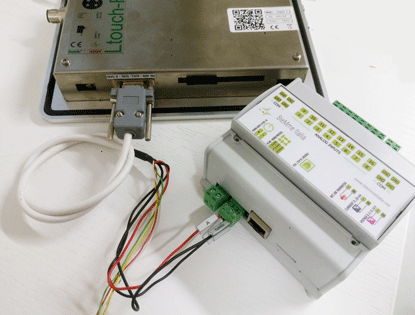
We prepare communication; We connect via a three-wire cable on Modbus device and Ltouch.

The Modbus RS485 port is positioned in the side of a connector DB9 and uses these pins:

  • 2 – A
  • 3 – B
  • 5 – GND

Set the speed of communications (thanks to our Libreria the app supports speeds up to 115200) and the timeout.

The Function 03:

Node Id: corresponds to the slave to read.

Start Register : corresponds to the first register for the Modbus read

Number Registers: Corresponds how many registers I want to read

Once configured these three fields we can, using the three buttons, perform the read request.

Single reading: Ltouch will perform a read-only and represents the values read on the screen.

Continuous cycle reading: Ltouch will perform the readings at intervals of a second in a cyclic mode. The values will be shown on screen.

FUNCTION 16:

With this feature we can write the integer values:

Node ID: It corresponds to the address of the slave in which I am going to write

Start Register: It is the first register in which I am going to write

Number Registers: It represents the number of consecutive registers in which I will write the value.

Value: It represents the value that will write.

To close the application just press over the Biemme logo

Android Arduino Communication through Modbus and Rs485

In this post I’d like to describe you a project I’m working on that consists of connecting an Android multi touch panel to one (or more) Arduino slave(s) using modbus protocol and RS485.
Even though the idea of this project could be applied in many fields, I chose to contextualize it in a typical smart home context: a touch display that dims lights, shows temperatures and bulbs statuses.


The nice feature of the Android multi touch panel I used is that it has many interfaces such as Ethernet, RS485, RS32 and I²C as well.
I expressly selected RS485 because Arduino-based microcontrollers are not ready for Ethernet yet (even though some examples still exist but without great success). Indeed, RS485 is a well known standard that has been widely used in the indus­trial con­text and in building automa­tion appli­ca­tions. It is a half-duplex, 2-wires, low noise bus that allows high speeds and remote devices connection (up to 1200 meters).
Furthermore, modbus is a serial communication protocol, developed for industrial applications, open and easy to deploy and maintain. I used modbus RTU, but other variations of the protocol still exist though. Continue reading

Using Bundle Android to Exchange Data between Threads

The question that I want to answer with this post is the following: How bundle Android works for exchanging data from a running thread to the main UI?

This is a fairly common situation in Android projects and very simple to figure it out. The context might be the following:

  1. An Android activity that creates a thread running some work
  2. The created thread has to exchange some data with the main UI thread

This situation can be handled by using a combination of Android bundles and messages. Continue reading

How to configure an Android Vnc Server

android vnc server from android clientIn this post I would like to show you the steps required to set up an Android Vnc Server to remotely control Android devices. This walkthrough has been tested with the Ltouch Android panels, but with simple modifications this tutorial can be used with any other Android devices.

Prerequisites:
The only requirement for this would be to have a rooted device (the Ltouch is already rooted). A basic knowledge of linux terminal commands could speed up the setup process. Continue reading

The Pltouch I/O Library as the PLC: An Example

In one of the first blog posts of the Pltouch series, we anticipated that the I/O library can be used in a way the PLC developers are familiar with (but it is not the only way of course).

PLC developers are accustomed to have a big infinite loop in which the code is executed sequentially. Conversely, in PC programs and in apps as well, this is not the case, there is no infinite loop and in mobile apps there are even many entry points. 

Based on those assumptions, the learning curve of PLC developers that want to embrace the Android/Java world might be steep. In order to smooth the steepness of this learning curve, the Pltouch I/O library allows users to continue to use the PLC-style  way of doing things even in the context of Android apps. 

Continue reading