 The project I’m working on is about making a home automation system using an ARM Cortex A8 1Ghz Android based development board and some Arduino slaves that communicates using rs485 and modbus.
In the previous article, I wrote about how to create Arduino slaves that wait and answer for modbus requests. Indeed, I also made some performance tests in case of rs485 communication failure. Please take a look at the end of the article.
It is now time to present how to write an Android project that acts as a master and communicates with slave devices.
The nice thing of this design is that the logic that controls the smart home system is not constrained to be on the masters’ node. Instead, it can be distributed across all the Arduino devices. Indeed, since rs485 and modbus protocol were designed for industrial environments, this project could be easily used in industrial automation.
The prerequisites are the following:
- Eclipse IDE,
- Eclipse ADT plugin,
- Android SDK
For those of you that are not already familiar with Eclipse and with creating Android apps, this tutorial could be a good starting point.
Basically, the Android project is formed by the following files:
- on the /src folder, the main Activity and the Java class that defines the modbus signatures for the external modbus library
- on libs/armeabi folder, the modbus library
- on res/layout, the layout of the main activity
- on res/drawable-hdpi, res/drawable-ldpi, res/drawable-mdpi and res/drawable-xdpi folders, the images for the yellow and red bulb (supplied by Doublejdesign UK)
- on res/values folder, string.xml file
- on the main folder, the AndroidManifest.xml
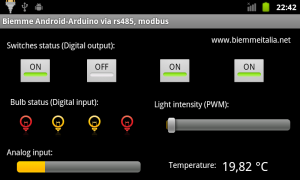
The user interface is displayed in the figure at the top of this page. It has some yellow/red bulb icons that account for the status of the bulb in the home, 4 toggle buttons and 2 analog statuses (for temperature sensors) and a slider for controlling the light intensity.
The xml layout follows in the next block of source code. I used the AbsoluteLayout, even though more responsive layouts could be used instead. I deliberately kept apart IU design principles for a moment, focusing firstly on describing the technical aspects behind this project, leaving to you, reader, to express yourself and design the best interfaces that follow your needs.
<AbsoluteLayout xmlns:android="http://schemas.android.com/apk/res/android"
    xmlns:tools="http://schemas.android.com/tools"
    android:layout_width="match_parent"
    android:layout_height="match_parent"
    android:background="@color/black">

<TextView
    android:id="@+id/textView2"
    android:layout_width="wrap_content"
    android:layout_height="wrap_content"
    android:layout_marginLeft="10dp"
    android:layout_marginTop="10dp"
    android:layout_x="12dp"
    android:layout_y="20dp"
    android:text="Switches status (Digital output):"
    android:textColor="@color/white"
    android:textColorHighlight="@color/white" />

<TextView
    android:id="@+id/textView1"
    android:layout_width="wrap_content"
    android:layout_height="wrap_content"
    android:layout_marginBottom="14dp"
    android:layout_marginRight="20dp"
    android:layout_x="376dp"
    android:layout_y="10dp"
    android:text="www.biemmeitalia.net"
    android:textColorHighlight="@color/white"
    android:textColor="@color/white"/>

<TextView
    android:id="@+id/textView3"
    android:layout_width="wrap_content"
    android:layout_height="wrap_content"
    android:layout_marginLeft="10dp"
    android:layout_marginTop="180dp"
    android:layout_x="12dp"
    android:layout_y="210dp"
    android:text="Analog input:"
    android:textColor="@color/white" />

<ProgressBar
    android:id="@+id/progressBar1"
    style="?android:attr/progressBarStyleHorizontal"
    android:layout_width="220dp"
    android:layout_height="wrap_content"
    android:layout_marginBottom="36dp"
    android:layout_marginLeft="22dp"
    android:layout_x="30dp"
    android:layout_y="236dp"
    android:max="1023" />

<ToggleButton
    android:id="@+id/toggleButton3"
    android:layout_width="wrap_content"
    android:layout_height="wrap_content"
    android:layout_x="282dp"
    android:layout_y="54dp"
    android:text="ToggleButton" />

<ToggleButton
    android:id="@+id/toggleButton2"
    android:layout_width="wrap_content"
    android:layout_height="wrap_content"
    android:layout_x="152dp"
    android:layout_y="54dp"
    android:text="ToggleButton" />

<ToggleButton
    android:id="@+id/toggleButton4"
    android:layout_width="wrap_content"
    android:layout_height="wrap_content"
    android:layout_x="414dp"
    android:layout_y="54dp"
    android:text="ToggleButton" />

<ToggleButton
    android:id="@+id/toggleButton1"
    android:layout_width="wrap_content"
    android:layout_height="wrap_content"
    android:layout_x="34dp"
    android:layout_y="54dp"
    android:text="ToggleButton" />

<ImageView
    android:id="@+id/imageView1"
    android:layout_width="wrap_content"
    android:layout_height="wrap_content"
    android:layout_x="25dp"
    android:layout_y="152dp"
    android:src="@drawable/red_bulb" />

<TextView
    android:id="@+id/textView4"
    android:layout_width="wrap_content"
    android:layout_height="wrap_content"
    android:layout_marginLeft="10dp"
    android:layout_marginTop="180dp"
    android:layout_x="274dp"
    android:layout_y="125dp"
    android:text="Light intensity (PWM):"
    android:textColor="@color/white" />

<TextView
    android:id="@+id/textView3"
    android:layout_width="wrap_content"
    android:layout_height="wrap_content"
    android:layout_marginLeft="10dp"
    android:layout_marginTop="115dp"
    android:layout_x="18dp"
    android:layout_y="121dp"
    android:text="Bulb status (Digital input):"
    android:textColor="@color/white" />

<ImageView
    android:id="@+id/imageView3"
    android:layout_width="wrap_content"
    android:layout_height="wrap_content"
    android:layout_x="147dp"
    android:layout_y="152dp"
    android:src="@drawable/red_bulb" />

<ImageView
    android:id="@+id/imageView2"
    android:layout_width="wrap_content"
    android:layout_height="wrap_content"
    android:layout_x="82dp"
    android:layout_y="152dp"
    android:src="@drawable/yellow_bulb" />

<ImageView
    android:id="@+id/imageView4"
    android:layout_width="wrap_content"
    android:layout_height="wrap_content"
    android:layout_x="205dp"
    android:layout_y="152dp"
    android:src="@drawable/red_bulb" />

<SeekBar
    android:id="@+id/seekBar1"
    android:layout_width="220dp"
    android:layout_height="wrap_content"
    android:layout_x="296dp"
    android:layout_y="157dp"
    android:max="128" />

<TextView
    android:id="@+id/temperature"
    android:layout_width="wrap_content"
    android:layout_height="wrap_content"
    android:layout_x="395dp"
    android:layout_y="230dp"
    android:text="10 °C"
    android:textAppearance="?android:attr/textAppearanceLarge"
    android:textColor="@color/white" />

<TextView
    android:id="@+id/textView5"
    android:layout_width="wrap_content"
    android:layout_height="wrap_content"
    android:layout_x="300dp"
    android:layout_y="235dp"
    android:text="Temperature:"
    android:textColor="@color/white" />

</AbsoluteLayout>
The references to the colors used throughout the code are stored in the string.xml file. It has to be placed inside the res/values folder in your Android project.
<?xml version="1.0" encoding="utf-8"?>
<resources>
    <string name="app_name">BiemmeIOdemo</string>
    <color name="white">#FFFFFF</color>
    <color name="black">#000000</color>
</resources>
The ModbusLib class simply declares the signatures of the modbus library functions that will be used in the Android project.
package com.biemme.iodemo;

public class ModbusLib {
        public native static long openCom();
        public native static long ReadHoldingRegisters(int fd, int id, int address, int no_of_registers,int []holdingRegs);
        public native static long WriteMultipleRegisters(int fd, int id, int address, int no_of_registers,int []holdingRegs);
        public native static long closeCom(int fd);
        static{
                System.loadLibrary("com_biemme_iodemo_ModbusLib");
        }
}
It’s now time to analyze the java code that manages the main activity (called MainActivity.java). As a matter of clarity, I’ll comment out each key part of the class separately. If you want to take a look directly to the whole class, you’ll find at the bottom of the page an archive containing the entire project together with source files.
As seen from the signature, the MainActivity extends the Activity class in order to be an Android displayable window and implements two interfaces OnClickListener and OnSeekBarChangeListener that manage the click event of the buttons and seekbar events.
public class MainActivity extends Activity implements OnClickListener, OnSeekBarChangeListener
The first method that is triggered (by an intent) when the windows is open is the OnCreate. It simply set the content view (i.e., it explicitly connects the view to the controller) and links the graphical elements like button, progress bar, image view to the referring class’ private attributes (in such a way they can be referenced back later on in the class). Calling the setOnClickListener method will register the referring object to the click event (this means that when a button is clicked the onClick method will be executed).
protected void onCreate(Bundle savedInstanceState) {
	super.onCreate(savedInstanceState);
	Log.d("msg","onCreate");
	setContentView(R.layout.activity_main);
	btn = new ToggleButton[4];
	inp = new ImageView[4];
	temp = (TextView) findViewById(R.id.temperature);
	setTitle("Biemme Android-Arduino via rs485, modbus");

	btn[0] = (ToggleButton) findViewById(R.id.toggleButton1);
	btn[1] = (ToggleButton) findViewById(R.id.toggleButton2);
	btn[2] = (ToggleButton) findViewById(R.id.toggleButton3);
	btn[3] = (ToggleButton) findViewById(R.id.toggleButton4);

	for (int i=0; i < pins; i++){
		btn[i].setOnClickListener(this);
	}
	prg1 = (ProgressBar) findViewById(R.id.progressBar1);
	skb1 = (SeekBar) findViewById(R.id.seekBar1);
	skb1.setOnSeekBarChangeListener(this);

	inp[0] = (ImageView) findViewById(R.id.imageView1);
	inp[1] = (ImageView) findViewById(R.id.imageView2);
	inp[2] = (ImageView) findViewById(R.id.imageView3);
	inp[3] = (ImageView) findViewById(R.id.imageView4);
}
The following onResume method will be executed when the activity first starts (but after the onCreate) or after it is paused. It contains the methods that open the device’s serial port and stores the file id into a private variable. Indeed, it starts refreshing the statuses of the buttons by sending modbus requests to slave devices.
protected void onResume() {
	super.onResume();
	Log.d("msg","onResume");
	if (fid == 0){
		fid = ModbusLib.openCom();
	}
	stopUpdates();
	startRefreshValues(0,0);
}
The startRefreshStatuses method creates a new task and repeatedly executes it at fixed rate. The task creates an object as an instance of updateView’s inner class and since it is a Runnable object, it runs by calling the execute method.
private void startRefreshStatuses(final long delay){
	TimerTask tt=new TimerTask() {

		public void run() {
            runOnUiThread(new Runnable() {
                public void run() {
                	new updateView().execute();
                }
            });
        }
	};
	t=new Timer();
	t.scheduleAtFixedRate(tt, delay, 500);

}
The following updateView AsnyncTask class implements doInBackground and onPostExecute methods. The former will be executed when the task starts and, as soon as it finishes, the onPostExecute method will be triggered (this method can access the graphical objects of an Activity whereas doInBackground does not). The background method is devoted to call the modbus Read Holding Register (Function Code 3) and pass the returned values to onPostExecute that updates the window.
private class updateView extends AsyncTask<Integer, Integer, int[]>{

	private int[] holdingRegs;
	@Override
	protected void onPostExecute(int[] result) {
		if (result!=null){

			for (int i=0; i < 4; i++){
				if (btn[i].isChecked() && result[i+6]==0){
					btn[i].setChecked(false);
				}else if (!btn[i].isChecked() && result[i+6]==1){
					btn[i].setChecked(true);
				}

			}
			//Analog Input
			prg1.setIndeterminate(false);
			prg1.setProgress(result[0]);

			double temperatureC = (double)holdingRegs[1];
			temperatureC = (((temperatureC*5.0)/1024.0)-0.5)*100;

       			DecimalFormat df = new DecimalFormat("#.00");
			temp.setText(String.valueOf(df.format(temperatureC)+" °C"));

			//Digital Input
			for (int i=0; i < 4; i++){
				if (result[i+2]==1){
					inp[i].setImageResource(R.drawable.yellow_bulb);
				}else{
					inp[i].setImageResource(R.drawable.red_bulb);
				}
			}
			//PWM
			skb1.setProgress(result[9]);

		}
	}
	@Override
	protected int[] doInBackground(Integer... params) {

		try{
			int retries = 0;
			int no_of_registers;
			int node_to_write = 1;
			long bytes_received = 0;
			int starting_address = 0;
			holdingRegs = new int[35];

			no_of_registers = 10;

			do{
				bytes_received = ModbusLib.ReadHoldingRegisters((int)fid,node_to_write,starting_address,no_of_registers, holdingRegs);

				if (bytes_received>7){
					String s="("+String.valueOf(bytes_received) + ")";
				for (int i=0; i<no_of_registers; i++){
					s+=String.valueOf(holdingRegs[i]);
					s+=",";
				}
				Log.d("modbus3F:", s);
					return holdingRegs;
				}
				retries++;
			}while(bytes_received>0 || retries<5);

	}catch(Throwable t){
		Log.d("modbusERR", t.toString());
	}
		return null;
	}
}
Writing modbus registers could be performed by executing the DelayedWrites task in a similar way as with the updateView method.
private void DelayedWrites(final int address, final int value, final long delay){
	TimerTask tt=new TimerTask() {

		public void run() {
            runOnUiThread(new Runnable() {
                public void run() {
                	new WriteRegisters().execute(address, value);
                }
            });
        }
	};
	tW=new Timer();
	tW.schedule(tt, delay);
}
private class WriteRegisters extends AsyncTask<Integer, Void, int[]>{

	private int[] holdingRegs;
	@Override
	protected void onPostExecute(int[] result) {
		if (result!=null){
			//if the writes give no error, enable the buttons
			changeButtonsState(true);
			startRefreshValues(0,900);
		}
	}

	@Override
	protected int[] doInBackground(Integer... params) {

		try{

			int no_of_registers = 1;
			int node_to_write = 1;
			long bytes_received = 0;
			int starting_address = 1;
			holdingRegs = new int[35];
			int retries = 0;

			starting_address = params[0];		//address of the register to write
			holdingRegs[0]=params[1];		//value to write

			do{
				bytes_received = ModbusLib.WriteMultipleRegisters((int)fid, node_to_write, starting_address, 1, holdingRegs);
				retries++;

				if (bytes_received > 11){
					String s="("+String.valueOf(bytes_received) + ")";
					s+="["+ String.valueOf(calls++) +"]";
				for (int i=0; i<bytes_received; i++){
					s+=String.valueOf(holdingRegs[i]);
					s+=",";
				}
				Log.d("modbus16F:", s);
				return holdingRegs;
				}
			}while (bytes_received<=11 || retries<5);
			return null;

	}catch(Throwable t){
		Log.d("modbusERR", t.toString());
	}
		return null;
	}
}
Download: On our GitHub page you’ll find the demo Android project that shows how to communicate with modbus slaves (not only to Arduino, but with PLC too) by using a modbus library written in native code.
Disclaimer: The demo library shipped within the tar archive works only with devices that has address=1 and the first 10 registers only (0 to 9) could be retrieved (for ReadHoldingRegisters) and only the first register could be written (for WriteMultipleRegisters). In order to test the project, extract the BiemmeIOdemo folder from the archive, create a new Eclipse project by specifying the folder just extracted.
Performance test: I also wrote a post about performance test in case of rs485 communication failure.
If you liked this article, please share it!
As usual, comments are welcome! 🙂
